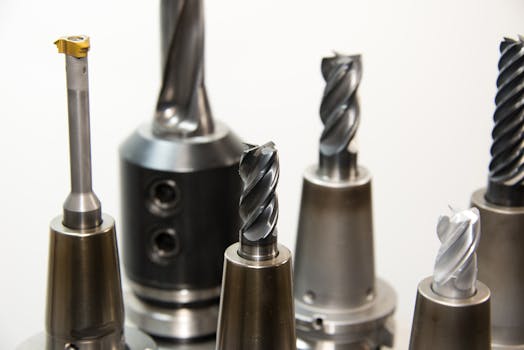

Ever watched a CNC machine whir to life, carving intricate designs or functional parts with almost surgical precision? At the heart of that magic lies a humble, yet incredibly vital component: the cnc end mill. It’s the cutting tool that does the heavy lifting, shaping raw material into finished products. Yet, for many operators and hobbyists, understanding the nuances of these tools can feel like navigating a maze.
I’ve seen it countless times – a perfectly good CNC setup held back by the wrong cutting tool. It’s frustrating, wasteful, and frankly, avoidable. This isn’t about advanced theory; it’s about practical knowledge that directly impacts your results. Let’s cut through the jargon and get down to what really matters when it comes to selecting and using your CNC end mills effectively.
What Exactly Is a CNC End Mill and Why Should You Care?
At its core, a CNC end mill is a type of rotating milling cutter. Unlike a drill bit, which primarily cuts downwards, an end mill can cut laterally (sideways) as well as downwards. This lateral cutting capability is what gives it its name – it has cutting edges on its side and end. They come in an astonishing variety of shapes, sizes, and materials, each designed for specific tasks and materials.
Think of it like having the right wrench for the job. Using a massive adjustable wrench on a tiny screw is inefficient and likely to cause damage. Similarly, using the wrong end mill for your material or operation will lead to poor surface finish, increased tool wear, broken tools, and ultimately, scrap parts. Getting this choice right is fundamental to achieving consistent, high-quality results.
Decoding the Anatomy: Key Features of an End Mill
Before we dive into selection, let’s quickly familiarize ourselves with the basic anatomy of an end mill. It’s not just a stick with teeth.
Flutes: These are the helical grooves machined into the body of the end mill. They carry away chips and provide cutting edges. The number of flutes is critical.
2 Flutes: Great for softer materials like plastics and aluminum. They provide excellent chip clearance, preventing clogging.
3-4 Flutes: Versatile, good for general-purpose machining in steels and some softer metals. They offer a good balance between cutting action and chip evacuation.
More than 4 Flutes: Typically used for finishing operations in harder materials. They provide a smoother surface finish but have less chip clearance.
Shank: The part of the end mill that’s held by the tool holder. It’s usually cylindrical.
Cutting Diameter: The diameter of the end mill’s cutting head.
Helix Angle: The angle of the flutes. A higher helix angle generally results in a smoother cut and better chip evacuation.
Coating: Many end mills feature specialized coatings (like TiN, TiAlN, ZrN) that increase hardness, reduce friction, and improve wear resistance, extending tool life.
Understanding these features will help you decipher manufacturer specs and make informed decisions.
Choosing Your Weapon: The Right End Mill for the Job
This is where practical application really kicks in. The material you’re cutting and the operation you’re performing are the two biggest drivers for end mill selection.
#### For Machining Metals: Steel, Aluminum, and Beyond
When you’re working with metals, material hardness and chip formation are paramount.
Aluminum: This soft, gummy metal requires good chip clearance. 2-flute end mills are often the go-to. Using carbide is highly recommended for its hardness. Consider uncoated or specific aluminum-cutting coatings.
Mild Steel: A workhorse material. 3 or 4-flute end mills are generally suitable. High-speed steel (HSS) or carbide are common choices. Carbide offers better rigidity and heat resistance. TiN or TiAlN coatings are beneficial.
Stainless Steel: Known for being tough and prone to work hardening. You’ll want a robust tool. Carbide end mills with a higher helix angle (around 30-45 degrees) and coatings like TiAlN or ZrN are excellent. Slower speeds and feeds are often necessary.
Tool Steels & Hardened Metals: For these demanding applications, you’ll need specialized carbide end mills. Often, these are uncoated or have advanced, wear-resistant coatings. Roughing end mills, with their aggressive cutting geometry, can be a good starting point for material removal before a finishing pass.
#### Tackling Plastics and Composites
Plastics can be tricky – they melt easily, and some can be abrasive.
General Plastics (Acrylic, ABS): 2-flute “O-flute” end mills are fantastic here. These have a single, sharp cutting edge with no spiral, designed for a clean, chip-free cut, minimizing melting and producing a polished edge. Single-flute with a mirror polish is ideal for plastics.
Nylon and Polycarbonate: Similar to other plastics, good chip evacuation is key. 2-flute end mills are a solid choice.
Composites (Carbon Fiber, Fiberglass): These are abrasive and can delaminate. Specialized single or multi-flute carbide end mills designed for composites are essential. Look for tools with high-quality carbide and often diamond coatings to withstand the abrasion. The goal is to cut cleanly without fraying the edges.
Beyond the Basics: Special End Mill Types to Know
Not all end mills are created equal, and sometimes a standard end mill just won’t cut it.
Ball Nose End Mills: These have a rounded tip, perfect for creating curved surfaces, 3D contours, and fillets. Essential for mold making and intricate designs.
Corner Radius End Mills: Similar to square end mills, but with a small radius at the corners. This adds strength to the cutting edge and helps prevent chipping, especially when machining harder materials. It also leaves a small fillet, which can be desirable.
Roughing End Mills: These have a serrated or scalloped edge. They aggressively chip away material, leaving a rough surface finish. They’re designed for rapid material removal in the initial stages of machining, reducing cycle times. Always follow up with a finishing pass using a standard end mill.
Engraving End Mills: These have very fine tips, often in a V-shape, for creating detailed text and graphics.
Best Practices for Maximizing Your End Mill’s Lifespan
Buying expensive end mills is one thing; making them last is another. Here’s how to get the most out of your investment.
- Proper Tool Holding: A secure grip is non-negotiable. Ensure your collet and tool holder are clean and the runout (wobble) is minimal. Excessive runout stresses the end mill and leads to poor performance.
- Correct Speeds and Feeds: This is
huge*. Too fast, and you’ll overheat and dull the tool. Too slow, and you’ll rub, generate heat, and get a poor finish. Consult your material’s machining data or start with conservative estimates and adjust based on observation.
Final Thoughts: Precision Starts with the Right Tool
The cnc end mill is more than just a cutting tool; it’s the architect of your precision parts. Understanding its role, deciphering its specifications, and applying a bit of practical know-how can transform your machining operations. Don’t be afraid to experiment (within reason, of course!) and learn what works best for your specific materials and machines.
By taking the time to choose the right end mill and treating it with the respect it deserves, you’re not just saving money on tooling; you’re investing in the quality, efficiency, and success of your projects. Happy machining!